写在前面
本项目取自 UCB CS61B SP18的Project0: NBody Simulation。作为CS61系列的第二门课,专注于数据结构与算法,本项目只是对Java有了个简单的认识。以下为笔者做题时的心得体会,如有错误或更好的想法,欢迎与我联系。
点这里向我发邮件~
具体实现
###The Planet Class and Its Constructor
这道题让我们了解了Planet这个类具体代表什么,存在哪些参数,还需要创建两个构造函数,两个拥有不同参数的构造函数。
- 创建实例变量。在这个类里面按照题目要求一步一步写即可。
- 创建构造函数1。这个构造函数存在六个不同的参数,按照题目要求写好签名,在构造函数内部使用
this即可完成。 - 创建构造函数2.这个构造函数存在一个参数,即一个已被实例化的
Planet,需要将此Planet复制到新Planet中,使用this与p.点表达式即可完成。
 1
 2
 3
 4
 5
 6
 7
 8
 9
10
11
12
13
14
15
16
17
18
19
20
21
22
23
24
25
26
| public class Planet {
public double xxPos;
public double yyPos;
public double xxVel;
public double yyVel;
public double mass;
public String imgFileName;
public Planet(double xP, double yP, double xV, double yV, double m, String img) {
this.xxPos = xP;
this.yyPos = yP;
this.xxVel = xV;
this.yyVel = yV;
this.mass = m;
this.imgFileName = img;
}
public Planet(Planet p) {
this.xxPos = p.xxPos;
this.yyPos = p.yyPos;
this.xxVel = p.xxVel;
this.yyVel = p.yyVel;
this.mass = p.mass;
this.imgFileName = p.imgFileName;
}
}
|
Understanding the Physics
在这里题目向我们介绍了此项目用到的物理知识,都是简单的高中物理知识,我在这里简单说一下。
- 万有引力公式。两个粒子之间存在相互吸引的力,大小为$F = \dfrac{G \cdot m_1 \cdot m_2}{r^2}$,方向指向对方。
- 勾股定理。$r^2 = dx^2 + dy^2$。
- 在x轴上的力。$F_x = \dfrac{F \cdot dx}{r}$。
- 在y轴上的力。$F_y = \dfrac{F \cdot dy}{r}$。
- 合外力。即同一方向上的力的和。
- 加速度。$a_x = \dfrac{F_x}{m}$ $a_y = \dfrac{F_y}{m}$。
Writing the Planet Class
calcDistance
此方法需要我们计算两行星之间的距离,运用勾股定理即可,值得注意的是,此题需要我们在一个Planet上使用点表达式来对另一个行星求解,也就是说,此题无法用static关键字。
 1
 2
 3
 4
 5
 6
 7
 8
 9
10
| public double calcDistance(Planet p) {
double x1 = this.xxPos;
double y1 = this.yyPos;
double x2 = p.xxPos;
double y2 = p.yyPos;
double xAbs = Math.abs(x1 - x2);
double yAbs = Math.abs(y1 - y2);
return Math.sqrt((xAbs * xAbs) + (yAbs * yAbs));
}
|
clacForceExertedBy
此方法需要我们计算两行星之间的万有引力,运用上文提到的万有引力公式即可,值得注意的是,此题向我们介绍了一个新的语法static final也即常量,同时也介绍了科学计数法的写法。在这里我们可以将万有引力常数G用科学计数法设为常量。
1
2
3
4
5
| private static final double G = 6.67e-11;
public double calcForceExertedBy(Planet p) {
double radiusSquare = this.calcDistance(p) * this.calcDistance(p);
return (G * this.mass * p.mass) / radiusSquare;
}
|
calcForceExertedByX and calcForceExertedByY
此方法需要我们计算两行星之间在x轴方向与在y轴方向上的力,用到的公式即为上文中的3 4两条,值得注意的是,在计算两行星之间的位移差时要注意哪个在前哪个在后。
 1
 2
 3
 4
 5
 6
 7
 8
 9
10
11
12
13
| public double calcForceExertedByX(Planet p) {
double distanceX = p.xxPos - this.xxPos;
double force = this.calcForceExertedBy(p);
double radius = this.calcDistance(p);
return (force * distanceX) / radius;
}
public double calcForceExertedByY(Planet p) {
double distanceY = p.yyPos - this.yyPos;
double force = this.calcForceExertedBy(p);
double radius = this.calcDistance(p);
return (force * distanceY) / radius;
}
|
calcNetForceExertedByX and calcNetForceExertedByY
此方法需要我们完成一系列行星对一个行星所施加的x轴与y轴方向的合分力(不知道也没有这个东西),值得注意的是,可以用到enhanced for来锻炼自己,以及continue用法。
 1
 2
 3
 4
 5
 6
 7
 8
 9
10
11
12
13
14
15
16
17
18
19
20
21
22
23
| public double calcNetForceExertedByX(Planet[] planets) {
double sumForce = 0;
for (Planet p : planets) {
if (this.equals(p)) {
continue;
} else {
sumForce += this.calcForceExertedByX(p);
}
}
return sumForce;
}
public double calcNetForceExertedByY(Planet[] planets) {
double sumForce = 0;
for (Planet p : planets) {
if (this.equals(p)) {
continue;
} else {
sumForce += this.calcForceExertedByY(p);
}
}
return sumForce;
}
|
update
此方法需要我们计算经过一系列力之后,行星最终会到什么地方去,看着题目很长,实际上很简单,跟着题目给的步骤一步一步做即可,值得注意的是,此题不需要返回任何东西,只是在目前行星更新自己。
 1
 2
 3
 4
 5
 6
 7
 8
 9
10
| public void update(double dt, double fX, double fY) {
double accelerationX = fX / this.mass;
double accelerationY = fY / this.mass;
this.xxVel += dt * accelerationX;
this.yyVel += dt * accelerationY;
this.xxPos += dt * this.xxVel;
this.yyPos += dt * this.yyVel;
}
|
Getting Started with the Simulator (NBody.java)
ReadRadius
此题需要我们读取一个文件中的半径,根据题目可知,半径在一个文件中的第二位,以double形式存储。观察BasicInDemo.java不难发现,对于In这个类来说,是按顺序来查找文件中的每个变量,并且要以符合的形式来控制,值得注意的是,在这里要加上static关键字,综上易得。
1
2
3
4
5
| public static double readRadius(String filename) {
In in = new In(filename);
int firstItemInFile = in.readInt();
return in.readDouble();
}
|
ReadPlanets
此题与上题类似,需要我们用In来不断读取内容,得到Planet的全部内容,并将其实例化为一个新的Planet,这里会用到Planet的构造函数1,可以得到,
 1
 2
 3
 4
 5
 6
 7
 8
 9
10
11
12
13
14
15
16
17
| public static Planet[] readPlanets(String filename) {
In in = new In(filename);
int totalPlanets = in.readInt();
Planet[] planets = new Planet[totalPlanets];
double radius = in.readDouble();
for (int i = 0; i < totalPlanets; i++) {
double xP = in.readDouble();
double yP = in.readDouble();
double xV = in.readDouble();
double yV = in.readDouble();
double m = in.readDouble();
String img = in.readString();
planets[i] = new Planet(xP, yP, xV, yV, m, img);
}
return planets;
}
|
Drawing the Initial Universe State (main)
跟着步骤一步一步来即可,很容易。
1
2
3
4
5
6
7
8
9
| public static void main(String[] args) {
String TString = args[0];
String dtString = args[1];
String filename = args[2];
double T = Double.parseDouble(TString);
double dt = Double.parseDouble(dtString);
Planet[] planets = readPlanets(filename);
double radius = readRadius(filename);
}
|
Drawing the Background
观察StdDrawDemo.java即可知道如何创建scale与background,跟着Demo走即可。
1
2
3
4
5
6
| private static final String imgPath = "images/starfield.jpg";
StdDraw.setScale(-radius, radius);
StdDraw.clear();
StdDraw.picture(0, 0, imgPath);
StdDraw.show();
|
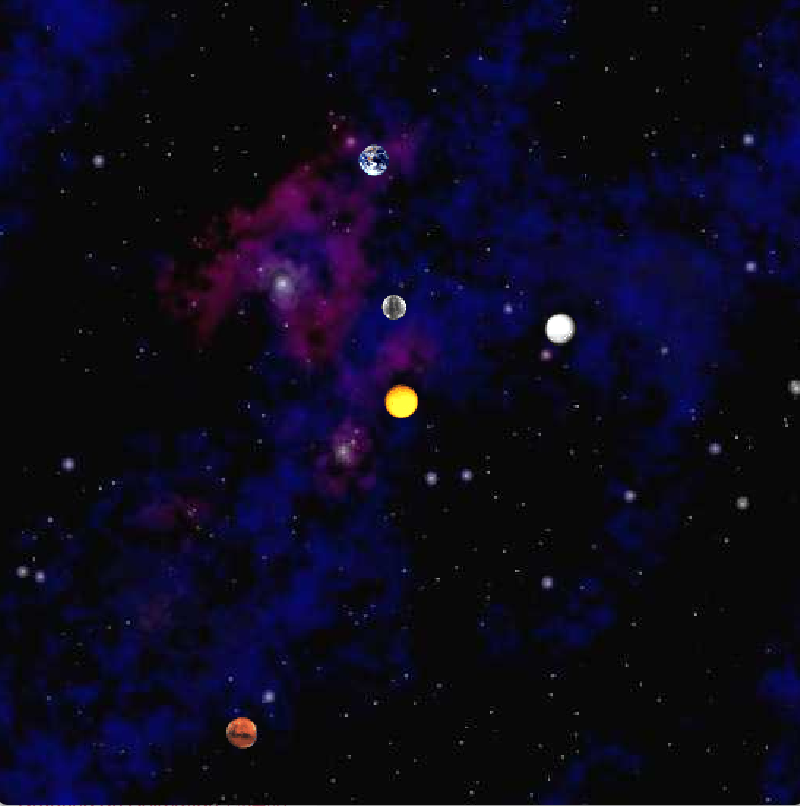
Drawing One Planet
使用StdDraw.picture()即可,题目要求在行星自己的位置上画自己,即xxPos与yyPos和imgFileName.
1
2
3
| public void draw() {
StdDraw.picture(xxPos, yyPos, "images/" + imgFileName);
}
|
Drawing All of the Planets
简单的迭代
1
2
3
| for (Planet planet : planets) {
planet.draw();
}
|
Creating an Animation
步骤都给出来了,写到后面也累了,大家自己看看吧(逃)。
1
2
3
4
5
6
7
8
9
10
11
12
13
14
15
16
17
18
19
20
| StdDraw.enableDoubleBuffering();
double time = 0;
while (time < T) {
double[] xForces = new double[planets.length];
double[] yForces = new double[planets.length];
for (int i = 0; i < planets.length; i++) {
xForces[i] = planets[i].calcNetForceExertedByX(planets);
yForces[i] = planets[i].calcNetForceExertedByY(planets);
}
for (int j = 0; j < planets.length; j++) {
planets[j].update(dt, xForces[j], yForces[j]);
}
StdDraw.clear();
StdDraw.picture(0, 0, imgPath);
        for (Planet planet : planets) {
            planet.draw();
        }
StdDraw.show();
StdDraw.pause(10);
time += dt;
|
写在后面
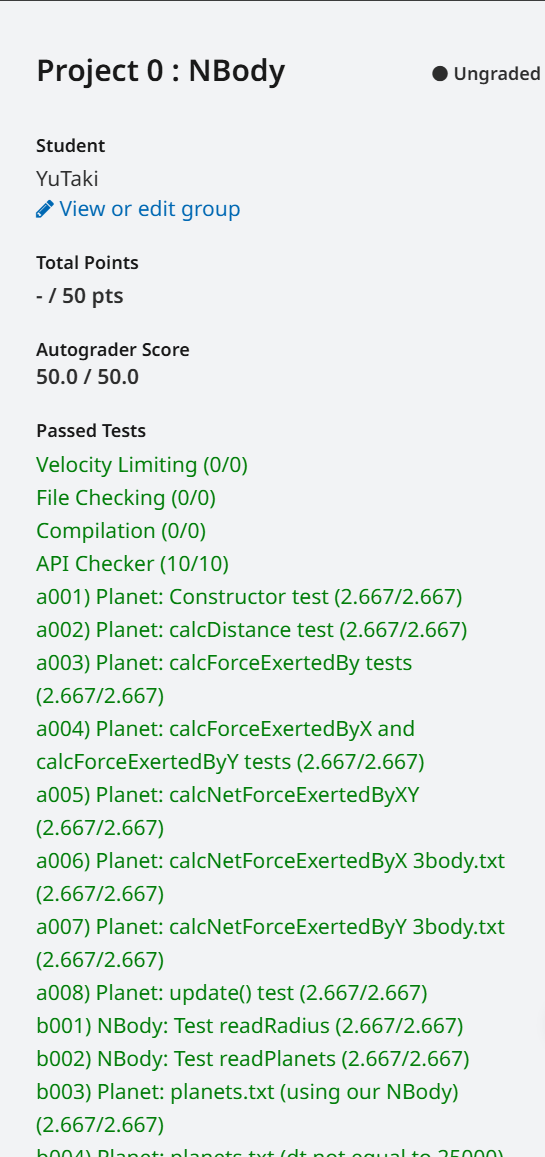
本项目已完成,用时大约四小时,当然这也不是我第一次做:( ,作为第二个复习课程的第一个项目,整体难度并不大,大部分代码框架与提示都已给出,跟着题目走即可。
点这里查看GitHub代码